%202%20(1).svg)
.svg)

Split Decisions: Mastering Your Mini Split AC Installation
Written by
On Time Heating & Cooling
Published on
September 23, 2025
Why Mini Split Installation is the Smart Choice for Wisconsin Homeowners
Mini split installation offers homeowners a flexible heating and cooling solution that doesn't require existing ductwork. These systems consist of an outdoor condenser unit connected to one or more indoor air handlers through refrigerant lines, providing efficient climate control for specific rooms or zones.
Key benefits of mini split systems:
- Energy efficient - Can save up to 40% on utility bills compared to traditional HVAC
- No ductwork required - Perfect for older homes or room additions
- Zone control - Heat or cool only the rooms you're using
- Quick installation - Can be completed in hours, not days
- Quiet operation - Indoor units run virtually silent
Basic installation steps:
- Plan and size your system based on room square footage
- Mount the indoor unit on an exterior wall at least 6 feet high
- Install the outdoor unit on a level pad with proper clearance
- Connect refrigerant lines and electrical wiring between units
- Test the system for proper operation and leaks
The average mini split installation ranges from $2,000 to $10,500 depending on the system size and complexity. While DIY installation is possible with pre-charged systems, many homeowners choose professional installation to ensure proper refrigerant handling, electrical connections, and warranty coverage.
For Wisconsin homeowners dealing with older homes that lack ductwork, mini splits provide an ideal retrofit solution that requires only a small hole through the wall for connections.

Planning Your Mini Split Installation: Sizing, Placement, and Prep

Proper planning is crucial for a successful mini split installation. It's the difference between a smooth project and a frustrating experience. Getting this phase right ensures years of efficient heating and cooling, while rushing can lead to an improperly sized or poorly placed system.
Choosing the Right System and Location
First, decide between a single-zone system (one indoor unit to one outdoor unit) for a specific area like an addition or garage, or a multi-zone system (multiple indoor units to one outdoor unit) for independent temperature control in several rooms.
BTU capacity must be correctly sized. An undersized system will struggle to cool, while an oversized one will cycle frequently, leading to poor humidity control and higher energy bills. The correct BTU rating depends on room square footage, ceiling height, insulation, and window exposure.
The SEER2 rating measures cooling efficiency. The 2023 minimum is 15, but modern units often range from 17 to 25 or higher. A higher SEER2 rating means lower energy bills, though the initial cost may be greater.
Proper placement is key. The indoor unit should be mounted high on an exterior wall (at least six feet up) to ensure effective air circulation. Keep it away from direct sunlight, heat sources, and obstructions like furniture. The outdoor unit requires a solid, level foundation, like a concrete pad, with at least 12 inches of clearance on all sides for proper airflow.
Line set length affects efficiency; while some systems allow for long distances, shorter is generally better. The condensate drain is also critical. The indoor unit produces water that must be drained away via a line with a slight downward slope to prevent water damage.
Tools, Materials, and Legal Requirements
The tool requirements for a mini split installation can be extensive. A basic DIY project with a pre-charged system requires a tape measure, level, stud finder, drill with a 3.5-inch hole saw bit, adjustable wrenches, and wire strippers. However, professional installation requires specialized, expensive tools like torque wrenches, vacuum pumps, manifold gauge sets, and micron gauges to ensure a proper, leak-free system.
Legally, permits are almost always required due to the electrical and refrigerant work. In Wisconsin, handling refrigerants requires EPA 608 certification for safety and environmental protection. Improper handling can lead to fines, and all electrical work must meet local codes. Factoring in tool costs, permits, and the risk of mistakes, professional installation is often the more sensible choice, providing peace of mind with licensing, insurance, and warranty coverage.
For determined DIYers, resources like This Old House's guide on mini-split installation offer detailed instructions, but calling an expert is always a wise option.
Your Step-by-Step Guide to Mini Split Installation
With the planning complete, it's time for the mini split installation. Before starting, prioritize safety: turn off all power to the work area and wear safety glasses and gloves.
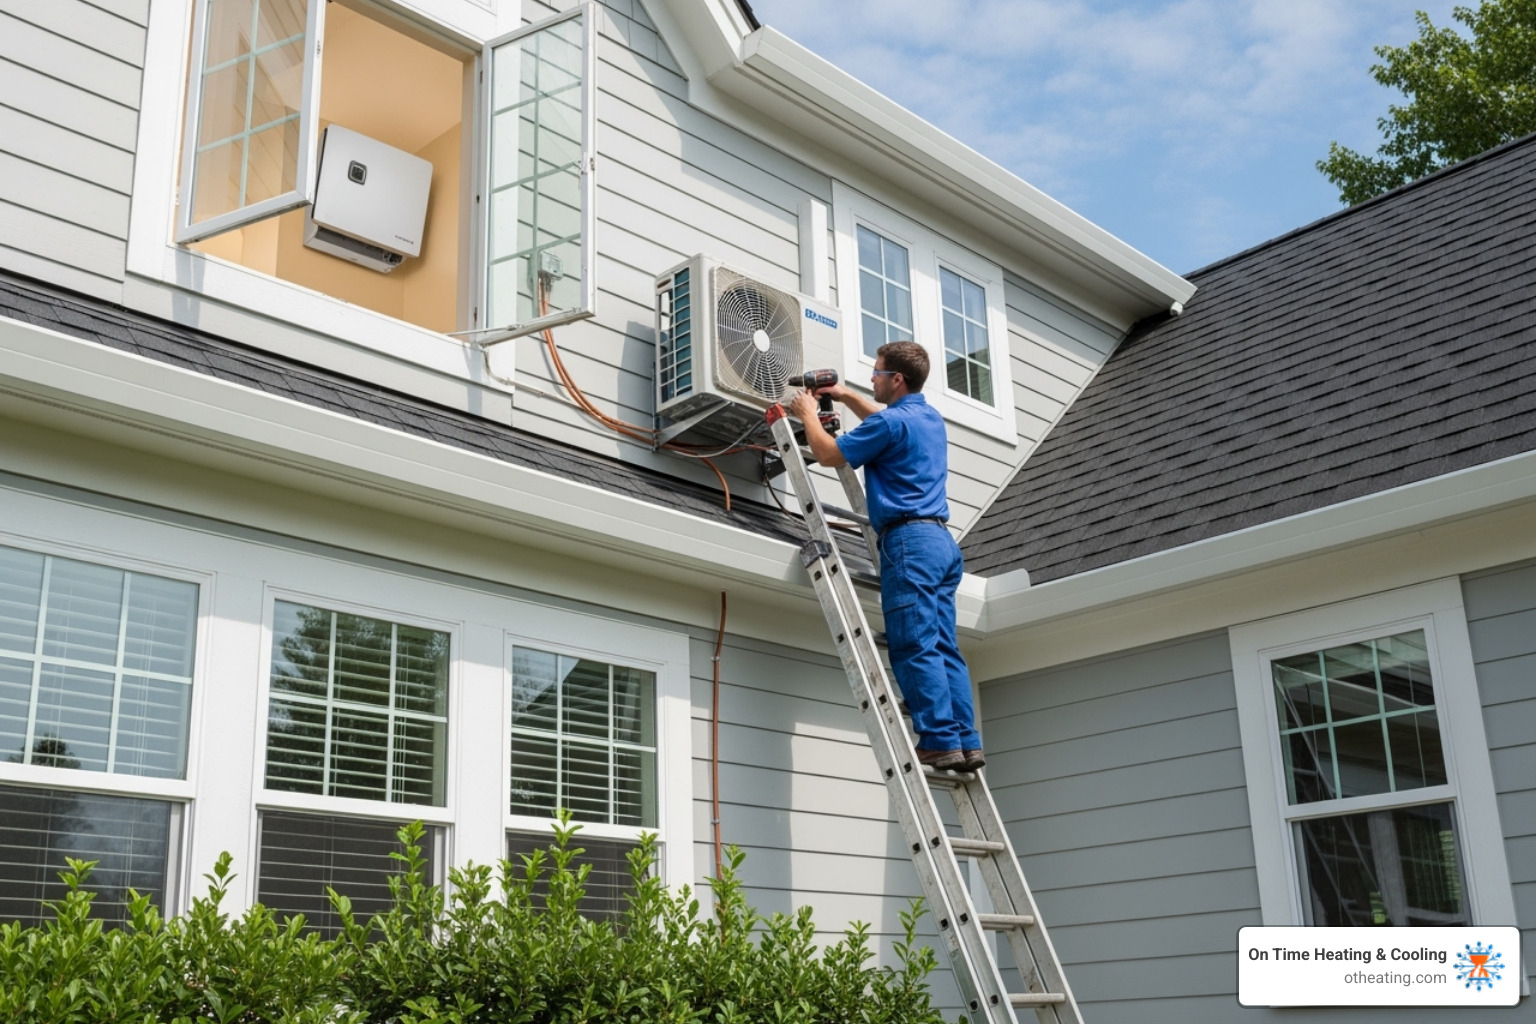
Step 1: Installing the Indoor Unit (Air Handler)
Start by securing the indoor unit's mounting plate to wall studs, ensuring it is perfectly level to prevent drainage issues. Next, use a hole saw (typically 2-3 inches) to drill a hole through the wall for the lineset and wiring. Drill this hole at a slight downward angle to the outside for proper drainage. Carefully feed the bundled lines through the wall, keeping the condensate drain line at the bottom. Finally, mount the indoor unit onto the bracket until it clicks securely into place.
Step 2: Installing the Outdoor Unit (Condenser)
The outdoor unit requires a stable location with at least 12 inches of clearance on all sides for airflow and service access. Place it on a level concrete pad or a sturdy wall bracket. Use vibration pads underneath to reduce noise and vibration. Secure the unit firmly according to the manufacturer's instructions to prevent future problems.
Step 3: Connecting the System
Connecting the system requires precision.

Carefully bend the copper refrigerant lines, avoiding kinks that restrict flow. The flaring connections are critical for a leak-proof seal. Use a proper flaring tool and a torque wrench to meet the manufacturer's specifications (e.g., 11.8 ft-lbs for 1/4" tubing, 19 ft-lbs for 3/8" tubing). Over or under-tightening can cause leaks. Apply refrigerant oil to the flare faces for a better seal.
For electrical connections, follow the wiring diagram precisely to connect the multi-conductor cable between units. Most systems require a dedicated circuit (often 220 volts), and this work is best left to a licensed electrician for safety and code compliance.
Route the condensate drain line to a suitable location with a continuous downward slope. Finally, install a line set cover to protect the lines from weather and UV damage for a clean finish. Given the complexity of refrigerant and electrical work, professional installation is recommended for safety and peace of mind.
DIY vs. Professional Installation: Making the Right Choice
Deciding between a DIY or professional mini split installation is a common dilemma. While DIY seems to save money, it's important to understand the full scope of the project.

Evaluating the Cost and Complexity
The primary appeal of DIY is cost savings, especially with pre-charged units that simplify the process. However, the reality is more complex. Specialized tools like torque wrenches, vacuum pumps, and flaring tools can cost hundreds of dollars, negating savings on a single project. The time commitment is also significant, as a weekend project can easily become a multi-weekend challenge for a first-timer.
Crucially, many manufacturers void their warranty if the system isn't installed by a licensed professional, leaving you responsible for future repair costs. Professional installation is an investment in experience, proper tools, and the assurance of a job done right. Our team at On Time Heating & Cooling has the expertise to handle any installation, ensuring your system runs efficiently from the start.
Common Mistakes in a DIY Mini Split Installation
Even skilled DIYers can make costly errors. Here are common mistakes we encounter:
- Improper flaring: Incorrectly formed or torqued flare connections on copper lines lead to refrigerant leaks, which are inefficient, expensive to fix, and environmentally harmful.
- Skipping the vacuum process: On non-pre-charged systems, failing to pull a deep vacuum leaves moisture in the lines, which can form acid and destroy the compressor. This requires specialized equipment.
- Electrical errors: Incorrect wiring can damage control boards or create fire hazards. High-voltage connections should always be handled by a licensed electrician.
- Poor placement decisions: Placing units without proper airflow or where circulation is blocked by furniture reduces performance, increases energy bills, and shortens the system's lifespan.
- Forgetting leak testing: All connections must be tested for leaks before operation. Professionals use nitrogen pressure tests and electronic detectors to ensure a tight system.
Due to the complexity and potential for error, professional mini split installation is a smart investment for most homeowners.
Post-Installation: Testing, Maintenance, and Troubleshooting
After your mini split installation is complete, a final series of checks ensures your system will run smoothly for years.
First-Time Startup and System Checks
Properly testing the system upon startup can prevent future headaches.
- Leak Test: This is the first priority. For DIY jobs, use soapy water on flare connections to check for bubbles. Professional installations involve a nitrogen pressure test (300 psi) and a deep vacuum test (to 500 microns or less) to guarantee a leak-free system.
- Power-Up: Turn on the main breaker and listen for the system to start. Begin with a moderate setting.
- Test All Modes: Run both cooling and heating functions (if applicable). Check for proper airflow and listen for any unusual noises. The system should operate quietly.
- Set Up Smart Features: Pair the remote control and connect the unit to your WiFi network to use smartphone apps for convenient control, a great feature for homeowners in Hartland, WI.
Long-Term Care for Your Mini-Split
Mini-splits are low-maintenance, but proper care is key to longevity and efficiency.
- Clean Filters Monthly: This is the most important task. Clean filters ensure good airflow, high efficiency, and better air quality. Check them more often during peak seasons.
- Inspect the Outdoor Unit: Regularly check the outdoor condenser for debris like leaves, grass, or snow that could block airflow, especially with Wisconsin's variable weather.
- Schedule Annual Professional Maintenance: An annual tune-up from a professional is a worthwhile investment. Our team at On Time Heating & Cooling will inspect refrigerant levels, electrical connections, and clean coils to catch potential issues early. Our punctuality is a promise to our Waukesha County customers.
If you encounter issues like poor cooling, water leaks, or strange noises, check the basics first (thermostat, filters, outdoor unit clearance). If problems persist, professional help is recommended. With proper care, your mini-split will provide reliable comfort for years.
Frequently Asked Questions about Mini-Split Installation
Here are answers to common questions about mini split installation we hear from Wisconsin homeowners.
How far can the indoor and outdoor units be from each other?
The allowable distance (lineset length) between units varies by system, with some models supporting lengths up to 328 feet. This flexibility allows for creative placement solutions. However, shorter distances are generally better for overall efficiency. Always consult the manufacturer's manual for your specific model's maximum length.
Do I need a permit to install a mini-split?
Yes, permits are almost always required for a mini split installation. This is due to the electrical work and refrigerant handling, which must comply with local safety codes and environmental regulations. Skipping permits can lead to fines, insurance issues, and problems when selling your home. When we perform installations in areas like Muskego, WI, and Germantown, WI, we handle all necessary permitting.
What is a good SEER2 rating for a mini-split?
SEER2 (Seasonal Energy Efficiency Ratio 2) measures a system's cooling efficiency. As of 2023, the federal minimum is 15. However, many modern mini-splits have SEER2 ratings from 17 to 42. A higher rating means greater energy efficiency and lower monthly bills. While high-SEER2 units may cost more upfront, the long-term savings are often a smart investment. For Wisconsin's climate, units with ratings in the upper teens or twenties offer a great balance of efficiency and value.
Is a DIY Installation Right for You?
Is a DIY mini split installation the right choice for you? While tempting, it's a complex project that requires significant mechanical skill, specialized tools, and patience.
This isn't a typical home improvement task. It involves precise refrigerant handling, perfect copper flaring, and potentially dangerous electrical work. Mistakes can lead to costly refrigerant leaks, system failure, or even fire hazards. Furthermore, most manufacturers will void the warranty if the system isn't installed by a licensed professional, leaving you without coverage.
For most homeowners in southeastern Wisconsin communities like Lannon, WI, Mukwonago, WI, or Richfield, WI, professional installation is the smarter choice. The team at On Time Heating & Cooling brings years of experience to every mini split installation, ensuring your system is sized correctly, connected safely, and optimized for performance.
What sets us apart is our commitment to punctuality—we show up when we say we will. We blend old-school reliability with modern expertise. The peace of mind from a safe, efficient, and warranty-protected installation far outweighs the potential savings of a DIY project.
Ready to do it right? Get a professional AC installation quote in Waukesha, WI and experience the On Time difference.
.svg)
.svg)
.svg)
Monday to Sunday:
24/7
24/7
Payments By:

review us on:
©
on time heating & cooling All rights reserved.
Designed & Developed By :
.svg)